Showing posts with label Gluten Free. Show all posts

Friday, 10 July 2015

Gluten Free Cheddar & Jalapeno Scones

Cheesy Scones!


If you're in the mood for an afternoon snack, or a light breakfast, these scones are perfect. They have a nice light texture to them, and are similar to the last recipe I posted for Gluten Free Tea Biscuits, although these were inspired and adapted to gluten free from these Sun-dried Tomato and Cheddar Scones by Hilah at HilahCooking.com. I LOVE her. She's creative, knowledgeable and funny. Check her out if you haven't yet, her Youtube Channel is just the best thing ever.


Back to the scones.  I've been on a jalapeno kick for months now, and instead of using sun-dried tomato and green onion, like Hilah did, I swapped in jalapenos.  And loved it.  If you don't love jalapenos, you can leave them out, or use sun-dried tomatoes like the original recipe.  Either way, I hope you try these and enjoy them  Let me know!


Gluten Free Cheddar and Jalapeno Scones

Cheesy Scones


gluten free cheddar scones
Prep Time:
Cook Time:
Yield:6


Ingredients:

  • 210 grams gluten free flour blend
  • 1 teaspoon xanthan gum, if your mix doesn't include it
  • 2 teaspoon baking powder
  • 1/2 teaspoon sugar
  • 3/4 teaspoons salt
  • 1/4 teaspoon black pepper
  • 57 grams butter, cubed and cold
  • 3/4 cups grated cheddar cheese
  • 1 jalapeno, seeded and minced
  • 2/3 cups buttermilk (I used almond milk + vinegar) + about 1 tbsp for brushing on top


Instructions:

  1. Preheat oven to 400
  2. In a large bowl, mix dry ingredients together.
  3. Cut in butter (with two knives, a fork, a pastry cutter, or your fingers), and then fold in cheese and jalapeno.
  4. Add milk and mix until it comes together in a ball.
  5. Turn out onto lightly floured counter and pat into a flat 8-inch disc (or roll it, your preference).
  6. Cut into 6 pieces, and lay each piece onto a baking tray lined with a silicone mat. Brush the tops with a bit of buttermilk and bake for about 25 minutes.


Adapted from Hilahcooking.com

Monday, 6 July 2015

Fluffy Gluten Free Tea Biscuits

Fluffy Tea Biscuits


This is a recipe that I only created a month or two ago, but as soon as I did I wondered why I hadn't tried to before now. As a kid, I can remember having tea biscuits almost every Sunday night it seemed. My sister I would be fresh from bathing, into pajamas and watching tv and we'd hear the tell-tale sounds of measuring cups and two knives being arranged in the kitchen while my Dad gathered everything to make tea biscuits or bannock. How fun it was sitting around the kitchen table, eating tea biscuits, drinking tea, just hanging out as a family.


This recipe comes together pretty easily. Just mix the dry ingredients together. Add the cubed butter, and either use a pastry tool, two knives or a fork, even your hands to process the butter into smaller pieces and have them all coated with flour. Freezing the full amount of butter and then grating it in would also work well. You could try a food processor also. Once that step is done, stir the milk in, roll the dough out and cut out rounds. Bake for about 15 minutes. This is actually a pretty quick recipe too. Maybe 30-45 minutes from start to finish? Perfect for a Sunday night snack with some tea.

What foods bring childhood memories back for you?


Fluffy Gluten Free Tea Biscuits


Gluten Free Biscuits
The fluffiest gluten free biscuits
Yield: 8
Preparation time: 10min
Cook time: 15min


Ingredients:

  • 300 grams gluten free flour mix
  • 1 teaspoon xanthan gum, if your mix doesn't include it
  • 3 teaspoons baking powder
  • 1 teaspoon baking soda
  • ¾ teaspoons salt
  • 70 g (5 Tbsp) butter, cold and cubed
  • 1 cup buttermilk*


Instructions:

      1. Preheat oven to 400 F (200 C)
      2. Mix dry ingredients together.
      3. Cut in butter with two knives, or a pastry tool. (I imagine a food processor would work too)
      4. Add buttermilk and stir together until combined.
      5. Roll dough to about an inch or so and cut out rounds. Place rounds onto silicone mat on cookie sheet.
      6. Bake 15 minutes or until light golden brown.
      7. Best within a day or two of baking.


    *or measure one tablespoon vinegar or lemon juice into a one cup measure then fill the rest of the way with milk. I use this method all the time with almond milk.

    Tuesday, 16 June 2015

    Jalapeño Macaroni and Cheese (Gluten Free)

    I LOVE homemade mac & cheese. Do you? Please say yes.

    If you haven't made homemade macaroni and cheese before, give this recipe a try. It's pretty easy and so tasty.

    When I make macaroni, I always remember 2-2-2-2. I use two tablespoons butter, two tablespoons flour, two cups of milk and two cups cheese. This is always my starting point, and from there I can make adjustments. Sometimes I use cheddar cheese. This time I used Monterey Jack because I thought the color contrast of a light cheese with the jalapenos would be nice. And I really liked it. I always add in a bit of mustard with my cheese sauce also (sometimes dry mustard powder), usually Dijon mustard. Salt and pepper only after you’ve added your cheese.

    For a bit more decadence, you can bake this afterwards with more cheese on top, or some gluten free bread crumbs. (Or both!)

    To make this ahead and have it ready to go in the oven for dinner, cook your noodles a little less by a minute or two (because they will cook in the oven and you don’t want mushy noodles). Then follow the recipe up to and including mixing the noodles into the cheese sauce. Pour the whole thing into a baking dish and then refrigerate until needed. Warm it in the oven at 350F (180 C) until hot and bubbly, about 30 minutes or so, but check it often after 20-25 minutes.


    To make this less spicy, remove the seeds from your jalapenos before adding them in. (Leave the seeds in for more spice!)

    What would you add in with this? I think corn would be a good addition. Also, I LOVE spice, so instead of eating this with ketchup like my son does, I drizzle some Sriracha sauce on top. I used the new Walmart brand of gluten free elbow macaroni noodles and was quite pleased with them. They were not at all mushy in leftovers the next day.


    Monterey Jack & Jalapeno Macaroni

    GF Mac & Cheese
    creamy macaroni and cheese with spicy jalapeno
    Yield:
    Preparation time: 5min
    Cook time: 8-12 min

    Ingredients:

    • 400 grams gluten free elbow noodles (fusilli or penne would be good here too)
    • 2 cups grated cheese (I used Monterey jack)
    • 2 tablespoons butter
    • 2 tablespoons gluten free flour mix
    • 2 cups milk
    • 2 jalapenos, seeded and finely diced
    • 1 teaspoon mustard (I used Dijon)
    • Salt and pepper to taste

    Instructions:

        1. Boil your noodles according to package directions. Then drain and let sit in colander while you make the cheese sauce.
        2. In a hot skillet or dutch oven, over medium-high heat, melt the butter. (In my cast iron enamel dutch oven on my stove top, I only need to use medium heat to get this very hot) Sprinkle flour over top of the melted butter and mix with whisk. Cook flour until light brown and nutty smelling. Add milk, a little at a time, whisking well to avoid having lumpy sauce. Once incorporated, let simmer and bubble until it thickens. Then add cheese, jalapenos, mustard and salt and pepper to taste. Mix reserved noodles into the sauce and serve.
        3. OPTIONAL: Use noodles that have been cooked a minute or two less than package time, and once everything is mixed together, pour into casserole dish, top with cheese and gluten free breadcrumbs if desired, then bake uncovered for 20-30 minutes at 350 F.

      Tuesday, 2 June 2015

      Pumpkin Waffles (Gluten Free)

      Pumpkin Waffles - a quick and fun breakfast

      My kids love a quick, ready to eat breakfast. Waffles are great for that. These are so quick to put together, but also, after I make them, I wrap the extras, put them in the fridge and then they are ready to pop into the toaster or use in a sandwich (my favorite - although not with pumpkin flavored ones.. haha)

      There is something about the little pockets, which make waffles seem very fancy to my kids too. They really feel like it's a special treat, which is always nice, especially in a recipe that has only 1-2 tablespoons of sugar in it.

      If you don't like syrup, like me, these are great with just butter, or nut butter. My daughter thinks they would be good with cream cheese on top and a sprinkle of cinnamon. My family assures me that they are great with maple syrup though. So top them how you like, either way - delicious. (I'm going to try cream cheese next)

      And I guess the flavors here might be more suited to fall, but I have a whole bunch of pureed pumpkin in the freezer that I wanted to use up. I hope you try these and like them too.

      What's your favorite waffle flavor? Or favorite quick breakfast?


      Gluten Free Pumpkin Waffles

      pumpkin waffle
      Yield: 8 waffles (in my waffle maker)
      Preparation time: 5min
      Cook time: 5-7min

      Ingredients:

      • 140 g (1 cup) all-purpose gluten free flour mix
      • 1 teaspoon xanthan gum, if not included in your mix
      • 2 tablespoons sugar (I use coconut sugar)
      • 1 teaspoon baking powder
      • ½ teaspoon baking soda
      • ¼ teaspoon salt
      • ½ teaspoon pumpkin pie spice
      • ½ cup pumpkin puree
      • 1 large egg
      • 2 tablespoons butter, melted and cooled
      • ½ cup milk
      • 1 teaspoon apple cider vinegar

      Instructions:

          1. In a medium bowl, mix together the flour, xanthan gum (if using), sugar, baking powder, baking soda and salt. Set aside.
          2. In another medium bowl, mix together the pumpkin, egg, butter, milk and apple cider vinegar.
          3. Make a well in the center of the dry ingredient s, then add the wet ingredients in and stir until combined.
          4. Cook according to your waffle maker’s instructions.

        Wednesday, 20 May 2015

        Gluten Free Perogy (Pierogy)


        Gluten Free Perogy.   Or Pierogi.  Or  Pierogy. However you want to spell them, they are awesome.  I use perogy.

        Fun fact: I went to a Ukrainian school for a year when I was a kid.  Then I went to Ukrainian-Immersion for another few years.

        Disclaimer: I am by no means an expert on perogies or anything Ukrainian. haha

        (EDIT: You know what, I was just reading that these are actually Polish. I've always thought they were Ukrainian. Very interesting. I had to add in this wikipedia info.)
        Varenyky (Ukrainian:) are stuffed dumplings of unleavened dough. Varenyky are nearly identical with some types of Polish pierogi. In some regions of Western Ukraine, such as Carpathian Ruthenia and Galicia, both terms, varenyky and pyrohy, are used to denote the same dish. The name pyrohy is also common for the Canadian Ukrainian. This can be attributed to the history of Ukrainian and Rusyn immigration to Canada, which came predominantly from the former Austro-Hungarian Empire, where the local dialects had many common words with Polish, German, Romanian and other Central European languages. -- source

        But I did eat a lot of perogies as a kid.  And as I grew up.  And then a couple of years ago, all of a sudden it was one of those foods that existed only outside of the things I was ok to eat. (If you’re Celiac too, or have a family member or friend who is, then you are familiar with this problem). 

        Perogies are one of those foods which prompted me to start creating my own recipes and to start this blog to share those recipes with other people who thought perogies (or pasta, or cookies, or crackers, etc…) were lost to them forever.  No way man, we’re not settling for that.  We’ll eat exactly what we want and it’ll taste just as good.

        Right?

        Anyway, like I said this one was of the first foods I recreated as gluten free by myself, and as such, these photos are a bit old.  Not my best.  But please make these anyway!! They are soo good.  And feel free to use white potato in yours.  However you want them.  Use a different filling completely if you like.  They are your perogies now and you can eat them as you please.  (But topped with sour cream is my favorite.)


        And make extra and freeze them.  To do this, just make the dough, fill and assemble, but don’t boil the perogies.  Freeze them in a single layer on a pan, and when they are frozen move them to a large freezer bag or container. Then when you crave perogies, just continue with the rest of the recipe steps by bringing a large pot of water to boil, drop frozen perogies in and boil about 5 minutes or so. (when they float, they are ready). Eat right away, or sauté them in a pan, and then cover with melted butter, fried onions and sour cream. Yum.

        Enjoy!


        What are some of the foods you've missed most, or were the happiest about when you found a way to have them gluten free?


        Rolled and cut out, about the thickness you want your dough.


        Filled and closed up, lined up ready to either freeze or cook and eat.


        Gluten Free Perogies

        Gluten Free Perogy

        Gluten Free Yam Perogies

        Yield: 18 – 3 ½ inch perogy rounds

        Preparation time: 30-45min

        Cook time: 5min


        Ingredients:

        • 140 grams gluten free flour blend
        • 1/2 teaspoon xanthan gum (omit if this is included in your flour mix)
        • 40 grams tapioca flour
        • pinch of salt
        • 1 large egg
        • 1/4 cup cold mashed potato (I used mashed yam)
        • 2 tablespoons sour cream
        • 1 teaspoon olive oil
        • Filling: I used a 450 gram yam, boiled then mashed it, saved ¼ cup for the dough and used the rest, seasoned with salt and pepper, as my filling

        Instructions:

            1. In a large bowl, whisk together flour mixture, tapioca flour, salt and xanthan if using.
            2. Add mashed potato and combine. Add egg, sour cream and olive oil and mix together until it comes together as a ball.
            3. Roll out on a non-stick surface (baking mat, parchment paper) using tapioca flour lightly so your rolling pin doesn’t stick. Cut out rounds and gather scraps to re-roll for more rounds. Roll quite thin.
            4. Put about a tablespoon of your favorite filling into the middle of your round. Use egg white around one half of your round and fold dough in half around the filling. Pinch seam together. Repeat for all rounds.
            5. Bring a large pot of water to boil, add about 7-8 pierogi to the boiling water at a time, and boil about 3-4 minutes. They are done when they float.
            6. Sauté in butter for a minute or two per side to crisp up, if desired. Yummy served with extra sour cream.

          Tuesday, 5 May 2015

          Banana Oat Pecan Mini Loaves


          This recipe can be made as either muffins, or mini-loaves. This amount made 8 mini loaves and 12 muffins for me.

          For the muffins, I used paper liners in the pan and for the mini loaves, I just brushed the pan with oil.


          We all loved these for afternoon snacks, and breakfast.


          Mash your banana, have all ingredients at room temperature and this recipe comes together so quickly.  These are so good with just a bit of butter, or even almond butter.  I hope you like them.


          Banana Oat Pecan Mini Loaves

          Gluten Free Banana Oat Loaf
          gluten free mini quick bread loaf
          Yield: 8 mini loaf + 12 muffins
          Preparation time: 10min
          Cook time: 20min

          Ingredients:

          • 113 g (1/2 cup) butter, at room temperature
          • ½ cup brown sugar
          • ½ cup white sugar
          • 2 large eggs
          • 2 large bananas, mashed
          • ½ cup buttermilk (I used cashew milk + vinegar)
          • 1 teaspoon vanilla
          • 200 grams all-purpose gluten free flour mix
          • 1 teaspoon xanthan gum, if not included in your mix
          • 1 teaspoon baking soda
          • ½ teaspoon baking powder
          • ½ teaspoon salt
          • ½ cup rolled oats
          • ½ cup pecans, chopped

          Instructions:

              Preheat oven to 350 and line muffin tin with paper cases, or grease mini loaf pan.
              1. In a stand mixer (or by hand), cream together butter and the sugars.
              2. Add bananas and eggs, mix to combine. Add buttermilk, and vanilla, and mix again.
              3. In a medium bowl, mix dry ingredients together, leaving out the pecans and oats.
              4. Add dry ingredients gradually to mixer bowl, until combined.
              5. Add oats and pecans. Mix.
              6. Scoop batter into pan you’re using, until each well is about halfway full.
              7. Bake for about 20 minutes, or until done.

            Tuesday, 28 April 2015

            Gluten Free Salt & Pepper Crackers


            Crackers are one of the things I missed most about having to be gluten free. Bread was definitely one, but crunchy, crispy crackers are probably one of my favorite snacks. I’ve tried my share of store bought crackers, but these ones, for me, are the best.

            They don’t taste like they’re made in a factory. They are crispy. They are VERY peppery, because I love pepper. If you don’t, cut back a bit (by about half). Feel free to experiment with topping also. I’ve tried them with a Himalayan Pink Sea Salt and Cracked tri-color Peppercorn topping – so good. I’ve tried them with just extra sesame seeds on top, and I tried an “everything” style with white and black sesame seeds, garlic salt, poppy seeds and onion flakes. I love them all.


            Also in the ingredients you’ll notice stars beside the millet flour and oat flour. This is because, if you don’t have these two flours, this recipe also works with 150 grams of the all-purpose flour mix that I use. So those two amounts of the flours can be replaced by the same amount, in grams, of all-purpose mix. Comment if you try them and let me know if you try a different topping too.


            Gluten Free Crackers

            gluten free salt and pepper crackers
            Yield: About 48 crackers
            Preparation time: 25min
            Cook time: 18-20min
            Ingredients:
            • 100 grams all-purpose gluten free flour mix
            • 25 grams millet flour*
            • 25 grams oat flour*
            • ½ tsp xanthan gum, if your mix doesn't include it
            • ½ teaspoon salt, plus more for topping
            • ½ teaspoon pepper, plus more for topping
            • 1 tablespoon white sesame seeds
            • ½ tablespoon black sesame seeds
            • 85 grams butter, cold and cut up, plus 57 grams butter, melted
            • 4-6 tablespoons cold water
              Instructions:
                1. Mix together dry ingredients.
                2. Cut in the cold butter with a pastry tool, or two butter knives.
                3. Add the water, a tablespoon at a time, until the mixture comes together as a ball.
                4. Flatten into a disc, wrap in plastic and chill for 20 minutes.
                5. Preheat oven to 350 F (180 C)
                6. Roll the dough out, on a silicone baking mat, until very thin (about the thickness of a nickel or so. I covered my whole silpat sheet.
                7. Use a pizza cutter, or sharp knife and cut into cracker (taking care not to cut your baking mat.
                8. Use a fork, or skewer to poke holes in the crackers (to prevent puffing up)
                9. Bake 18-20 minutes.
                10. Use the second amount of butter, melted, to brush over top of the top of the crackers, working half of the sheet at a time, and then sprinkle any desired toppings. Let cool. (They will get crispier once they cool.
              * You can also replace the oat and millet flour with the same amount, in grams, of all-purpose flour mix instead.

              Monday, 20 April 2015

              Gluten Free Dark Chocolate Cupcakes


              Somehow the weekend got away from me with dance recitals and hockey games and I forgot to post this.


              Last week’s chocolate cake recipe turns into cupcakes perfectly, and I simplified the process by not separating the eggs and not whipping the egg whites.  Other than that, and a shortened cooking time, the recipe is exactly the same as the cake. 


              I made a dark chocolate buttercream, just by adding some Hershey’s Dark Cocoa in the buttercream. I then topped them with a bit of Fleur de Sel. So good. I hope you make them and love them too.


              Dark Chocolate Cupcakes

              gluten free dark chocolate cupcakes
              Yield: 16
              Preparation time: 5min
              Cook time: 20min
              Ingredients:
              • 225 grams all-purpose gluten free flour
              • 1 teaspoon xanthan gum if not included in you flour mix
              • 30 grams dark cocoa (I use Hershey's Special Dark)
              • 1 teaspoon baking soda
              • ½ teaspoon baking powder
              • 113 grams butter, room temperature
              • ¾ cup sugar
              • ¾ cup brown sugar
              • ¼ cup oil
              • 2 eggs
              • ¾ cup buttermilk (non-dairy is fine, I used cashew milk + vinegar)
              • 1 tablespoon vanilla extract
              • ¼ cup strong instant coffee
                Instructions:
                  1.Preheat oven to 350 F (175 C). Line Muffin tin with paper liners.
                  2. In a small bowl, mix together flour, xanthan gum if using, dark cocoa, baking soda, and baking powder.
                  3.Cream together butter and sugars.
                  4.Mix together the eggs, oil, buttermilk and vanilla.
                  5.Mix the batter together, alternating dry and wet ingredients, starting with adding a third of the flour mixture to the bowl. Combine. Add half of the wet ingredients. Combine. Add another third of the flour mixture and combine again. Add the other half of wet ingredients and then the rest of the dry, mixing after each.
                  6.Add the warm coffee, mixing to combine.
                  7.Fill paper liners 2/3 full and bake at 350 until done (about 20 minutes). A toothpick will come out without wet better.
                  8. Let cool in the pan 10-15 minutes then move to cooling racks to cool completely before icing.

                Thursday, 16 April 2015

                Gluten Free Dark Chocolate Layer Cake


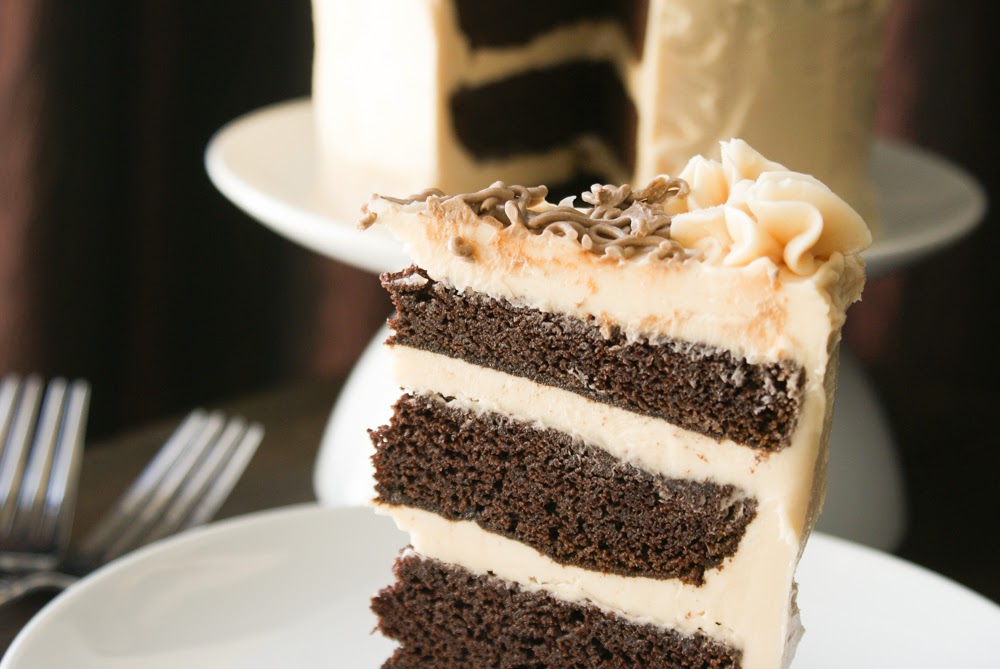
                Hi. Just look at that cake.  It was pretty and sooo delicious.  I haven’t had a good chocolate cake (maybe even NO chocolate cake) in a couple of years.  I do love my fudgy brownies recipe for a good chocolate hit, but this cake gives me more options.  It turns into great cupcakes also, which I’ll post tomorrow.  


                But for birthdays, you can’t go wrong with this one.  It’s light, not dry in the slightest and is so dark chocolately. It just makes me happy. I made it a Birthday cake, an Easter cake and a Happy Wednesday cake just because it was so good.  I use and love Hersey’s Dark Chocolate, but I’m pretty confident that you could use regular cocoa and get away with it.  Either way, make it today! Happy Thursday!


                Dark Chocolate Layer Cake

                Rich and airy gluten free dark chocolate cake

                Yield: 3 – 6-inch layers

                Preparation time: 15min

                Cook time: 25min

                Ingredients:
                • 225 grams all-purpose gluten free flour
                • 1 teaspoon xanthan gum if not included in you flour mix
                • 30 grams dark cocoa (I use Hershey's Special Dark)
                • 1 teaspoon baking soda
                • ½ teaspoon baking powder
                • 113 grams butter, room temperature
                • ¾ cup sugar
                • ¾ cup brown sugar
                • 2 eggs, separated
                • ¾ cup buttermilk (non-dairy is fine, I used cashew milk + vinegar)
                • 1 tablespoon vanilla extract
                • ¼ cup strong instant coffee
                  Instructions:
                    1. Preheat oven to 350 F (175 C). Prepare 3 6-inch pans with butter, cocoa and a parchment circle on the bottom.
                    2. In a small bowl, mix together flour, xanthan gum if using, dark cocoa, baking soda, and baking powder.
                    3. Cream together butter and sugars.
                    4. Mix together the egg yolks, oil, buttermilk and vanilla.
                    5. Whisk the two egg whites until soft peaks. (Or use a stand mixer for this)
                    6. Mix the batter together, alternating dry and wet ingredients, starting with adding a third of the flour mixture to the bowl. Combine. Add half of the wet ingredients. Combine. Add another third of the flour mixture and combine again. Add the other half of wet ingredients and then the rest of the dry, mixing after each.
                    7. Add the warm coffee, mixing to combine.
                    8. Fold in egg whites. Be gentle with the batter after this step, so as not to lose an air from the egg whites.
                    9. Divide the batter between 3 6” pans and bake at 350 until done (about 25 minutes). A toothpick will come out without wet better.
                    10. Let cool in the pan 15-20 minutes then move to cooling racks to cool completely before building a layer cake.

                  Monday, 6 April 2015

                  Easter Sugar Cookies - Gluten Free


                  I really do like this recipe.  So much that this is the third time I'm posting it here with a different way of decorating them.  It's so nice when a recipe comes together on the first try. It really helps make up for all the recipe failures.  This is definitely a no fail recipe that I always turn to. I hope you enjoy it too! 

                  Check out the original post for Pumpkin Sugar Cookies, and another one for Spring Sugar Cookies 


                  Easter Sugar Cookies

                  Gluten Free Sugar Cookies


                  sugar cookie

                  Prep Time:

                  Cook Time:

                  Yield:2-3 dozen cookies


                  Ingredients:

                  • 227 grams butter (room temperature)
                  • 200 grams sugar (I used xylitol but white sugar in the same amount should work)
                  • 1 large egg
                  • 1 tablespoon vanilla extract
                  • 280 grams all-purpose gluten free flour
                  • 1 teaspoon xanthan gum if your mix does not include it
                  • 1/2 teaspoon baking powder
                  • 1/4 teaspoon salt


                  Instructions:

                  1. Preheat oven to 350 F
                  2. Cream together the butter and sugar until it's a really light yellow (I use a stand mixer)
                  3. Add the egg and vanilla and mix until combined.
                  4. In a small bowl, whisk together the flour, salt and baking. Add this dry mixture to the sugar and butter, half at a time, and mix well.
                  5. Scoop dough out onto a piece of plastic wrap and chill in the fridge for 20-30 minutes. (This makes it easier to cut out shapes.)
                  6. Flour counter with tapioca starch and use half of the dough (put the rest back in plastic in the fridge.)
                  7. Roll out dough until about an eighth of an inch to a quarter of an inch thick or so.
                  8. Dip a cookie cutter in some of the tapioca starch on the counter and cut out cookies.
                  9. Place cut cookies on a pan lined with either parchment paper or a non-stick baking sheet (like Silpat)
                  10. Bake at 350 for 10-12 minutes or until lightly golden around the edges.
                  11. Repeat with other half of dough.
                  12. Let cool completely before icing.

                  Monday, 23 March 2015

                  Spring Sugar Cookies - Gluten Free


                  I made my sugar cookie recipe the other day, decorated with royal icing, for spring.  We spent two days spring cleaning the house. My dad’s birthday is the day after the first official day of spring.
                  Why am I telling you this?

                  Because I woke up to snow on the ground again this morning.  


                  So I’m posting these happy, bright spring cookies today to remind myself that it is spring and warmer weather will come soon. Even if we are under a blanket of snow today.

                  What’s the weather like where you are?


                  Sugar Cookies

                  Gluten Free Sugar Cookies


                  sugar cookie

                  Prep Time:

                  Cook Time:

                  Yield:2-3 dozen cookies


                  Ingredients:

                  • 227 grams butter (room temperature)
                  • 200 grams sugar (I used xylitol but white sugar in the same amount should work)
                  • 1 large egg
                  • 1 tablespoon vanilla extract
                  • 280 grams all-purpose gluten free flour
                  • 1 teaspoon xanthan gum if your mix does not include it
                  • 1/2 teaspoon baking powder
                  • 1/4 teaspoon salt


                  Instructions:

                  1. Preheat oven to 350 F
                  2. Cream together the butter and sugar until it's a really light yellow (I use a stand mixer)
                  3. Add the egg and vanilla and mix until combined.
                  4. In a small bowl, whisk together the flour, salt and baking. Add this dry mixture to the sugar and butter, half at a time, and mix well.
                  5. Scoop dough out onto a piece of plastic wrap and chill in the fridge for 20-30 minutes. (This makes it easier to cut out shapes.)
                  6. Flour counter with tapioca starch and use half of the dough (put the rest back in plastic in the fridge.)
                  7. Roll out dough until about an eighth of an inch to a quarter of an inch thick or so.
                  8. Dip a cookie cutter in some of the tapioca starch on the counter and cut out cookies.
                  9. Place cut cookies on a pan lined with either parchment paper or a non-stick baking sheet (like Silpat)
                  10. Bake at 350 for 10-12 minutes or until lightly golden around the edges.
                  11. Repeat with other half of dough.
                  12. Let cool completely before icing.
                  Related Posts Plugin for WordPress, Blogger...