Showing posts with label Dinner. Show all posts

Wednesday, 20 May 2015

Gluten Free Perogy (Pierogy)


Gluten Free Perogy.   Or Pierogi.  Or  Pierogy. However you want to spell them, they are awesome.  I use perogy.

Fun fact: I went to a Ukrainian school for a year when I was a kid.  Then I went to Ukrainian-Immersion for another few years.

Disclaimer: I am by no means an expert on perogies or anything Ukrainian. haha

(EDIT: You know what, I was just reading that these are actually Polish. I've always thought they were Ukrainian. Very interesting. I had to add in this wikipedia info.)
Varenyky (Ukrainian:) are stuffed dumplings of unleavened dough. Varenyky are nearly identical with some types of Polish pierogi. In some regions of Western Ukraine, such as Carpathian Ruthenia and Galicia, both terms, varenyky and pyrohy, are used to denote the same dish. The name pyrohy is also common for the Canadian Ukrainian. This can be attributed to the history of Ukrainian and Rusyn immigration to Canada, which came predominantly from the former Austro-Hungarian Empire, where the local dialects had many common words with Polish, German, Romanian and other Central European languages. -- source

But I did eat a lot of perogies as a kid.  And as I grew up.  And then a couple of years ago, all of a sudden it was one of those foods that existed only outside of the things I was ok to eat. (If you’re Celiac too, or have a family member or friend who is, then you are familiar with this problem). 

Perogies are one of those foods which prompted me to start creating my own recipes and to start this blog to share those recipes with other people who thought perogies (or pasta, or cookies, or crackers, etc…) were lost to them forever.  No way man, we’re not settling for that.  We’ll eat exactly what we want and it’ll taste just as good.

Right?

Anyway, like I said this one was of the first foods I recreated as gluten free by myself, and as such, these photos are a bit old.  Not my best.  But please make these anyway!! They are soo good.  And feel free to use white potato in yours.  However you want them.  Use a different filling completely if you like.  They are your perogies now and you can eat them as you please.  (But topped with sour cream is my favorite.)


And make extra and freeze them.  To do this, just make the dough, fill and assemble, but don’t boil the perogies.  Freeze them in a single layer on a pan, and when they are frozen move them to a large freezer bag or container. Then when you crave perogies, just continue with the rest of the recipe steps by bringing a large pot of water to boil, drop frozen perogies in and boil about 5 minutes or so. (when they float, they are ready). Eat right away, or sauté them in a pan, and then cover with melted butter, fried onions and sour cream. Yum.

Enjoy!


What are some of the foods you've missed most, or were the happiest about when you found a way to have them gluten free?


Rolled and cut out, about the thickness you want your dough.


Filled and closed up, lined up ready to either freeze or cook and eat.


Gluten Free Perogies

Gluten Free Perogy

Gluten Free Yam Perogies

Yield: 18 – 3 ½ inch perogy rounds

Preparation time: 30-45min

Cook time: 5min


Ingredients:

  • 140 grams gluten free flour blend
  • 1/2 teaspoon xanthan gum (omit if this is included in your flour mix)
  • 40 grams tapioca flour
  • pinch of salt
  • 1 large egg
  • 1/4 cup cold mashed potato (I used mashed yam)
  • 2 tablespoons sour cream
  • 1 teaspoon olive oil
  • Filling: I used a 450 gram yam, boiled then mashed it, saved ¼ cup for the dough and used the rest, seasoned with salt and pepper, as my filling

Instructions:

      1. In a large bowl, whisk together flour mixture, tapioca flour, salt and xanthan if using.
      2. Add mashed potato and combine. Add egg, sour cream and olive oil and mix together until it comes together as a ball.
      3. Roll out on a non-stick surface (baking mat, parchment paper) using tapioca flour lightly so your rolling pin doesn’t stick. Cut out rounds and gather scraps to re-roll for more rounds. Roll quite thin.
      4. Put about a tablespoon of your favorite filling into the middle of your round. Use egg white around one half of your round and fold dough in half around the filling. Pinch seam together. Repeat for all rounds.
      5. Bring a large pot of water to boil, add about 7-8 pierogi to the boiling water at a time, and boil about 3-4 minutes. They are done when they float.
      6. Sauté in butter for a minute or two per side to crisp up, if desired. Yummy served with extra sour cream.

    Tuesday, 17 March 2015

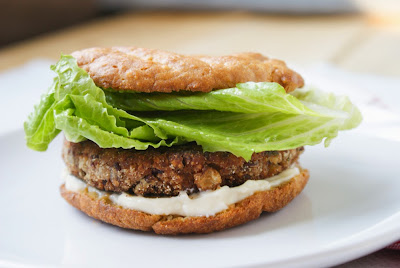
    Black Bean and Veggie Burgers (Gluten Free)

    Hi! This morning I have for you a tasty, adaptable, and healthy recipe for black bean burgers.  These are perfect for a gluten free dinner or lunch and so great if you or someone in your house is also eating gluten free and vegetarian.


    My twelve year old daughter is experimenting with being a vegetarian, and sticks to it for most of the time, but that leaves me scrambling sometimes at dinner. Having these ready all the time in the fridge or freezer as an option for her really helps out. (And for myself, because I love them too!)


    These burgers are easy to make because everything just goes right into the food processor to start. Forming into patties just takes a careful hand. These patties are also customizable – depending on your mood or seasonal vegetables.  Sometimes I put corn, sometimes peppers. I’d like to try carrot, cilantro and red onion mix. 


    These patties should please everyone though – and if they don’t, just change it up a bit.  Substitute in different veggies or add your favorite spices. This recipe works great with black beans also. Serve it plain, on a gluten free bun, or lettuce wrapped.  I hope you like them too!


    Gluten Free Bean & Veggie Burgers

    Gluten Free Bean & Veggie Burgers
    Yield: 6
    Preparation time: 5min
    Cook time: 10min
    Ingredients:
    • 1 - 19 oz. can black beans, or red kidney beans, drained and rinsed
    • 1 clove garlic
    • ½ small onion, quartered
    • ¼ cup parsley
    • Squeeze of lime juice
    • Salt and pepper, to taste
    • ½ cup almond meal
    • ¼ cup gluten free flour, plus more for coating
    • 1 large egg
    • ½ cup corn (or any other vegetable, diced)
    • Bun, bread, or lettuce wrap for serving (optional)
    • Toppings of your choice (mayo, sriracha, lettuce, tomato, cheese etc)

      Instructions:
        1. In a food processor, using the S-shaped chopping blade, pulse the onion and garlic into small pieces.
        2. Add all other ingredients, except the corn (or other vegetable), and process until mixed and to the texture you like.
        3. Scrape mixture into a mixing bowl, stir in corn, then divide into 6 sections.
        4. Place a small amount of flour on a plate.
        5. With each section of the mixture, work carefully to form a patty shape. Gently coat the patty in flour (work carefully, the burger are VERY soft)
        6. Once all patties are formed, fry them a few minutes on each side in an oiled non-stick skillet over medium heat. (I used a cast iron pan, but a non-stick should also work)
        7. Serve on a gluten free bun, toasted gluten free bread, or lettuce wrapped.
        NOTE: Works well with red beans also.

      Wednesday, 15 October 2014

      Cauliflower Soup


      Fall has firmly embraced the Canadian prairies.  Leaves are falling, I’m lugging around a heavy hockey equipment bag again every few days as my son attends practices, and we hosted another fully gluten free Thanksgiving dinner a few nights ago.  My favorite season.  Pumpkin recipes and fall treats are coming up on the blog, but first, this soup.

      For me, my favorite season is also about snuggling up in sweaters, blankets and slippers, drinking tea in the evening, cozying up by the fireplace with a book, and warm, hearty soups for dinner.  I hope you make this soup and love it too.


      Don’t be scared by the cauliflower – the trendy vegetables it seems at the moment. This soup is tasty, full of vegetables, seasoned as you like, creamy if you choose (I do!).  You completely control the final product and texture simply in how much you blend. I use an immersion blender and usually fully blend mine.  Blend less if you like it that way. It’s also lovely with a swirl of olive oil and chopped walnuts.  And pepper.  Extra pepper.  Enjoy!


      Step 5 looks rather long an unnecessarily confusing. It's just me being a bit wordy trying to explain the different processes of blending this soup. It's an easy step though whether you're using an immersion blender (my preference) or a stand blender.


      Cauliflower Soup

      Creamy Cauliflower soup packed with healthy vegetables.


      cauliflower soup

      Prep Time:

      Cook Time:

      Yield:4 bowls


      Ingredients:

      • 3 slices of bacon
      • 1 small onion, chopped
      • 3 cloves of garlic, roughly chopped
      • 1 head of cauliflower (mine weighed 927g)
      • 1 white sweet potato, peeled and chopped (mine weighed 260 grams)
      • 2 parsnips, peeled and chopped
      • 1 carrot, peeled and chopped (I used 100 g julienned)
      • 4 cups chicken broth
      • Salt and pepper to taste (I used ½ tsp of each)
      • ¼ cup coconut milk, if you want a creamier version


      Instructions:

      1. Trim cauliflower into big florets. Slice bacon and prepare other vegetables
      2. In a large pot (I use a cast iron dutch oven), over medium heat, render the bacon (cook until fat cover the bottom of the pot and the bacon is cooked). Scoop out bacon and reserve for later.
      3. Add onion to the pot and cook until softened but not browned. Add garlic, and the rest of the vegetables. Cook for a few minutes until slightly browned.
      4. Add chicken broth. Put the lid on the pot turn heat down slightly. Simmer 30-45 minutes until vegetables are just softened.
      5. Take the pot of the heat. At this point you have a few options depending on the texture you’re going for in the finished soup. For creamier soup: blend entire contents of pot, using either an immersion blender or a stand blender (in batches for the stand blender, and be careful, it’s hot!!) You can also choose whether to add the bacon now, or after blending. For chunkier soup: If you are using an immersion blender, remove as much vegetables as you want to a separate bowl, blend what’s left in the pot, then add vegetables back in, along with the bacon. For a stand blender, remove some vegetables to a separate bowl, then blend the rest of the contents of the pot in the blender in a few batches, depending on how much will fit at a time (careful, it’s hot!!) I have burned myself making this soup so please be very careful during the blending process! After last bath or soup is pureed in the blender and added back to the pot, add in the reserved vegetables and the bacon.
      6. Return pot to heat and add salt and pepper to taste.
      7. If you want an even creamier soup, add in ¼ to ½ cup of coconut milk (or cow’s milk or cream)
      8. Serve immediately. Garnish with olive oil and chopped nuts if desired. Eat with your favorite gluten free bread or crackers for a filling lunch or supper.
      Related Posts Plugin for WordPress, Blogger...